Thursday, February 21, 2019

Modding my PS1 - Power supply hacking (Part III)

Goal
Once again we'll hack the PS1 here.
This time it will be about the power supply.

DISCLAMER: Working with the power supply means working with 110V/220V. There's no need to modify the high voltage part of the power supply but keep in mind that touching it while it being plugged in or shortly after being unplugged can kill you. Don't do this hack if you're not an electrical engineer. You are on your own. I'm not responsible for anything that can be caused for trying this hack.

My problem is that I don't want to move to power off or reset the console.
The actual button pushing will be electrically done by a Raspberry Pi.
The most known way to turn on and off a switch is using a relay. Those are mechanical stuff that will die slowly, make noise while changing state and be big, among others.
Hopefully solid-state relays were invented and have no moving parts.
https://en.m.wikipedia.org/wiki/Solid-state_relay
I only have electromechanical relays though so I used them.


Inputs and outputs
In order to correctly simulate normal usage, the RPi must know whether the Reset button is pressed and whether the Power button is activated.
This gives 2 inputs.
It must also simulate Reset button (put LOW on one GPIO) and control one relay for 3.5V and another one for 8V.
The two relays will be controlled by the same GPIO.
That makes 2 outputs.

Reading inputs
The Reset button blocks connections between GND and the Reset signal.
In order to read the Reset status we measure the voltage of the left button pins: 0V means Reset is pressed, 3.5V means released.
The Power button controls both the 3.5V and the 8V lines.
This means the Power button being pressed would give 3.5V at the left of the button, and 0V if released.

Controlling power output
As discussed above, we need two relays (3.5V and 8V).
Also we need to cut the traces right after the buttons.


In this photo, I replaced the relays with jumpers


The relays have to connect the power sources and the power connector.
They will be controlled with a GPIO, using the same script than in Part II (software video switch) with another GPIO port.

Controlling reset output
If the RPi is dead I don't want the Reset signal to be sent, which means I'd want the corresponding GPIO not to be put LOW.
For this reason I'll use an NPN transistor.
Once again we'll use the GPIO controlling script.

Making it smart
The last thing to do is making a script reading the Reset and Power states and controlling the outputs based on these.
It is not done yet but it is coming.


Modding my PS1 - Power the Rasberry Pi from the PS1 power supply (PSX-VX Part V)

Goal
In this short article we'll power the RPi with the PS1 power supply.
Powering the RPi with an USB cable is ugly and defeats the purpose of a fully integrated system.

Stepping down from 8V
Unfortunately the supply only provides 3.5V and 8V.
We thus need to lower the voltage from 8V.
For this I use an LM2596 converter.

The principle is fairly simple:
  • PS1 power supply GND goes in IN-
  • PS1 power supply +8V goes in IN+
  • RPi GND goes to OUT-
  • RPi +5V goes to OUT+

LM2596 converter
Left: IN = PS1
Right: OUT = RPi

PS1 power supply: GND and +8V to connector
(Don't mind the 4 red and orange cables at the left)

Adjust OUT+
Before connecting the RPi, you must adjust the output voltage for it to be +5V (±5%).
This is easy: connect the +8V input to the PS1 power supply and put a voltmeter on the output.
Then turn the pot on the converter until the voltmeter shows +5V.

Power the RPi
The Pi can be powered through GPIOs, so OUT+ goes to the +5V GPIO (top right) and OUT- to one of the GND pins.
Everything should work now.

Sources

Modding my PS1 - RGB LED (PSX-VX Part IV)

As my PS1 receives more capabilities than initially thought by Sony, it needs a status LED showing more states than just ON/OFF.
For this reason I need to have more colors than just green.
I chose an RGB LED to replace the original LED.
It will be driven by a Raspberry Pi.


Deleting original LED
Getting rid of it is pretty quick.
Sadly its legs are bent so it's not practical but it will leave without too much work.

Placing the new LED
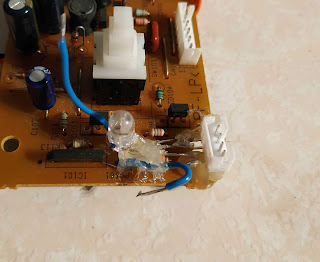
Hard rework of the traces is out of question so I left the whole LED with its legs above the board.
I bent them at around 100° to be able to solder something on it without touching something on the board.
I put a connector on the legs.
I kept the LED and the connector in place with some hot glue.

Controlling
Solder the VCC (or GND) and the 3 color legs (check if your LED is common anode or common cathode) to the RPi and choosing the color will be as easy as controlling 3 GPIO's.
The intensity of each color will be choosable using PWM.

Code
See the code at: https://github.com/electrojack/psxvx


Don't mind the two blue cables

Video
https://www.youtube.com/watch?v=XR9lDs6q3II

Saturday, February 2, 2019

Using arduino-cli

I missed the arrival of arduino-cli.
This is a great tool as we can finally use arduino libraries and codes without having to use the GUI, which I, personally, can't stand.

As usual my usage is different from the vast majority of people.
In this case I don't burn the bootloader so I can't use the upload functionality of arduino-cli.
Instead I use avrdude.

Everything stays easy though:

1. Follow the instructions here: https://github.com/arduino/arduino-cli


# 2. Install missing core (cf instructions)
nano .cli-config.yml           #add core: https://github.com/MCUdude/MiniCore
arduino-cli core update-index
# 2a. Look for your core
arduino-cli core list
# 2b. install it
arduino-cli core install MiniCore:avr

# 3. search for board name -> MiniCore:avr:328
arduino-cli board listall


# 4. Compile your project
arduino-cli compile --fqbn MiniCore:avr:328 myproject

# 5. Upload .hex file and fuses
sudo avrdude -p m328p -c linuxgpio -e -U flash:w:myproject.MiniCore.avr.328.hex \
       -U lfuse:w:0xe2:m -U hfuse:w:0xd9:m -U efuse:w:0xff:m


I had problems with avr-g++ and other binaries not being found.
I don't have the time to fix this nicely.

I edited ~/.arduino15/packages/MiniCore/hardware/avr/2.0.1/platform.txt


#change this:
#compiler.path={runtime.tools.avr-gcc.path}/bin/
#to this:
compiler.path=/usr/bin/   # or the directory where you have the avr-g++ binary
                          # you can use `whereis avr-g++`


Saturday, January 19, 2019

Modding my PS1 - Video switch (PSX-VX Part II)

Goal
In the second part of this PSX modding series, we'll focus on the video output.
The goal is to control the signal that is sent: instead of only the one from the PS1, I want to be able to switch it with another signal.
As always, you can find the source code here: https://github.com/electrojack/psxvx

PS1 video hardware
The video output is sent through the 12-pin proprietary AV MULTI OUT connector (that also sends sound signals).
There are actually three sent video signals through the cable: RGB, S-Video and composite.

In this article I'll work on the composite signal (https://en.wikipedia.org/wiki/Composite_video).
You can see the connector soldered on the board at the top right of the following picture, you can recognize it with its 2 rows of 6 pins.


Once again, info about the pins can be found in the PS1 bible.

  1      RGB-Video Green
  2      RGB-Video Red
  3      Supply +5.0V (eg. supply for external
           RF adaptor)
  4      RGB-Video Blue
  5      Supply Ground
  6      S-Video C (chrominance)
  7      Composite Video (yellow cinch)
  8      S-Video Y (luminance)        
  9      Audio Left      (white cinch)
  10     Audio Left Ground            
  11     Audio Right     (red cinch)  
  12     Audio Right Ground
  Shield Video Ground
            ____________________________
           | 12    10   8   6   4   2   |
           |    11    9   7   5   3   1 |
           |____________________________|

So my composite signal is pin 7.

Switcher circuit
Now I need a circuit whose output can be chosen by an input from two sources.
Fortunately, composite signals only have positive voltage so my circuit can be really simple.
There are special ICs to switch between video sources but I wanted to keep it simple: I made it with just 2N2222 transistors.


It only contains 3 resistors, 3 2N2222's and power supply (3.5V).

The next step is choosing the second source of video. I'll be using a Raspberry Pi for 2 additional reasons:
  • it can deliver 3.5V
  • it can drive the circuit through one of its GPIOs

Hardware work on RPi
My RPi is a Zero so it has no headers and the video output is done through the 'TV' pads.
All we have to do is soldering male pin headers (or wires) to 3.5V, GND (power supply), GPIO27 (driver) and TV out.

Hardware work on PS1
The composite video trace must be cut so the actual output is not sent to the video pin of the AV out port.
Then solder wires to AVOUT-pin7, actual video signal from the PS1 (follow the pin7 trace to find a blob to solder on) and video ground.

Wiring
RPI 3.5VSWITCH VCC
RPI GNDSWITCH GND
RPI GPIO 27SWITCH DRIVER
RPI TVOUT+SWITCH SOURCE 2
RPI TVOUT-PS1 VIDEO GND
PS1 AVOUT pin7 SWITCH OUTPUT
PS1 VIDEO SIGNALSWITCH SOURCE 1

Software work on RPi
Now we have to control the GPIO on the RPi.
I did it with a Python script.

import RPi.GPIO as GPIO
import sys
vidport = 27
GPIO.setwarnings(False)
GPIO.setmode(GPIO.BCM)
GPIO.setup(vidport, GPIO.OUT)
GPIO.output(vidport, sys.argv[1][0]!='f')

Save that as show_ps1.py and then you can run it with these commands:

python show_ps1.py true
python show_ps1.py false

Result
I'll add photos of the circuits later.
In the mean time here is a video of the actual result.